How to Strain Greek Yogurt at Home

This homemade greek yogurt straining guide is the whole trick in one sentence: take plain set yogurt and drain off the whey until it loses roughly half its volume. One litre of ordinary yogurt strains down to about 500 ml of thick, spoon-standing Greek yogurt, with the rest pouring off as acidic liquid whey. No special culture, no rennet, no machine required.
Greek yogurt is not a different ferment. It is the same thermophilic yogurt I set at around 43°C in my kitchen, only with the water phase mechanically removed. Once you understand that, you stop chasing exotic starters and start controlling the one variable that actually changes texture: how long, and how cold, you let it drain. Below is the method I use for every batch I’ve cultured, plus what to do with the whey that comes off it and how to push the same technique into labneh and skyr territory.
What Greek Yogurt Actually Is
Strip away the marketing and Greek yogurt is plain yogurt that has been strained to concentrate it. You make or buy ordinary plain yogurt first — a mesophilic-set version works, but the classic tangy result comes from a thermophilic culture set warm, around 43°C. Then you pour that finished yogurt into a cloth or filter, refrigerate it, and let gravity pull the whey out over a few hours.
Removing whey concentrates everything left behind, including protein, which is why strained yogurt is markedly higher in protein than the yogurt it came from. I won’t put a number on grams or make any nutrition claim — the honest, verifiable statement is simply that straining removes liquid and concentrates the solids and protein already in your yogurt. If you’ve made your own batch and want the foundations right before you strain, my beginner’s homemade yogurt guide covers the set itself.
Straining Tools Compared
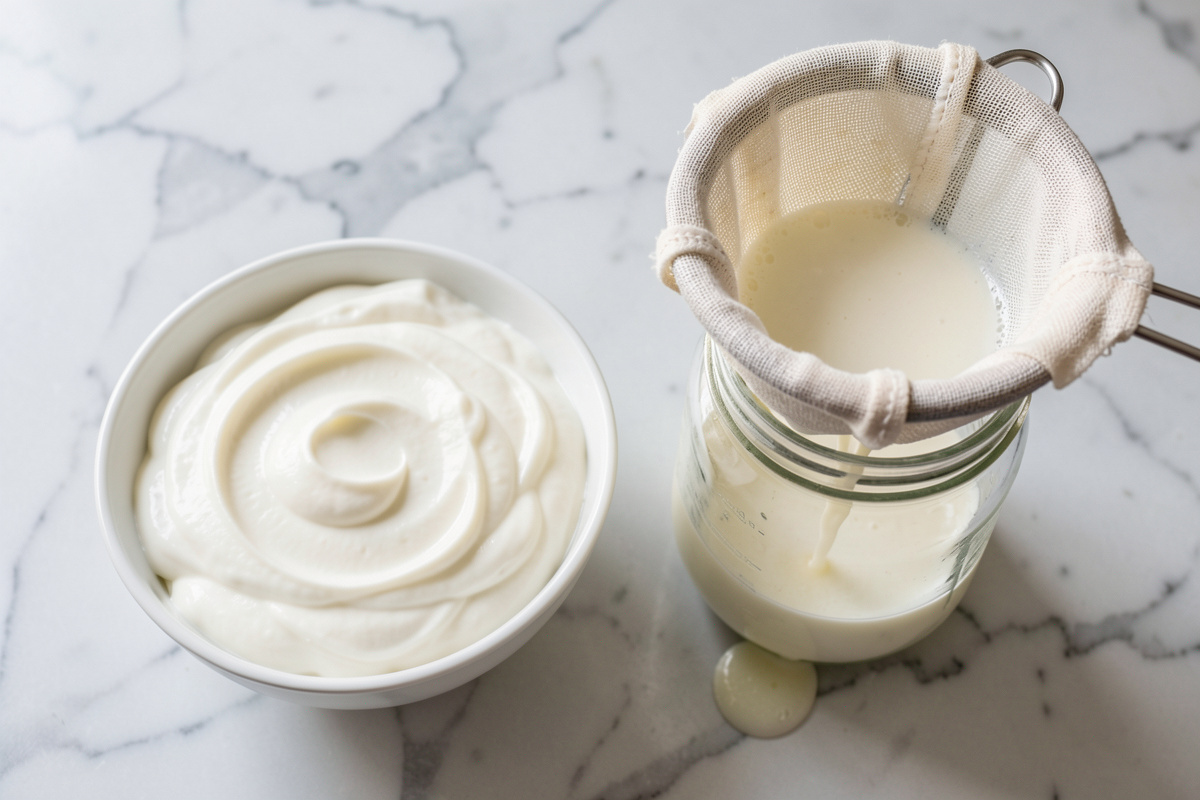
You have four practical options, and I’ve used all of them on the batches I’ve cultured. Cheesecloth is the traditional choice; double or triple-layer it, because single-layer butter muslin lets solids creep through. A fine cloth such as a clean linen tea towel or a dedicated nut-milk bag works beautifully and is reusable — this is what I reach for most. A coffee filter (paper, sitting in a sieve) drains slowly and gives an extremely smooth result but clogs on larger batches. And a dedicated yogurt strainer, which is just a fine mesh basket over a catch vessel, is the most convenient if you strain often.
Whichever you choose, the principle is identical: cloth or mesh suspended over a bowl so the whey can drip away freely. The bag-style strainers are the ones I recommend if you want something reusable that handles a full litre without clogging.
A reusable yogurt and nut-milk straining bag is the single piece of gear I’d buy first — it rinses clean, lasts for years, and skips the waste of paper filters.
As an Amazon Associate I earn from qualifying purchases.
The Method, Step by Step
Here is exactly how I strain, start to finish:
- Start with cold yogurt. Use plain yogurt straight from the fridge. Cold yogurt drains cleanly and, crucially, keeps acidity in check while it sits.
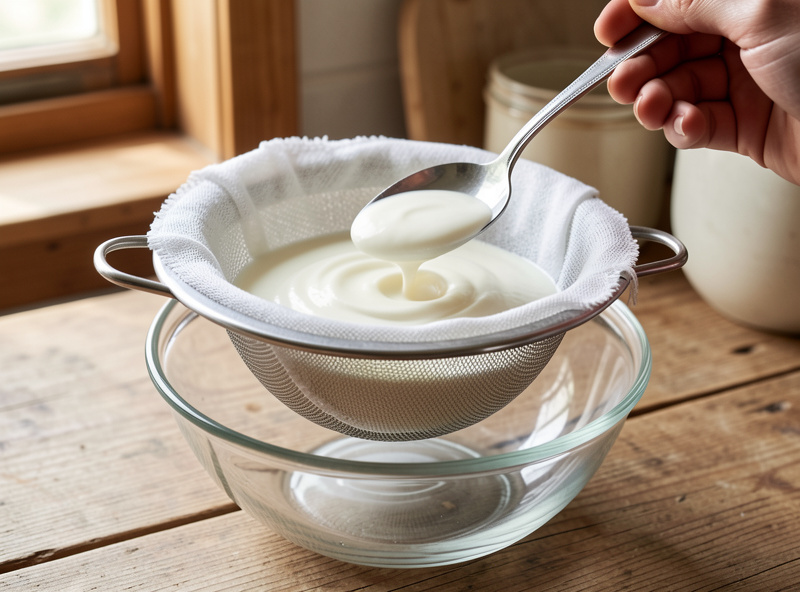
- Line your vessel. Set a sieve or colander over a deep bowl and line it with double-layered cheesecloth, a fine cloth, or a coffee filter. Leave enough cloth to fold over the top.
- Pour in the yogurt. Tip the full amount in, fold the cloth loosely over the surface to keep it covered, and make sure the base of the sieve sits well above the whey that will collect below.
- Refrigerate, don’t counter-strain. Put the whole rig in the fridge. Straining at room temperature lets the residual Lactobacillus keep working and over-acidifies the batch — cold is non-negotiable.
- Drain to your target texture. Anywhere from 2 to 8 hours depending on how thick you want it (see the next section).
- Scrape and store. Scrape the Greek yogurt off the cloth, give it a brief stir to even out the texture, and store it in a sealed jar. Keep the whey — it’s useful.
If your finished yogurt tastes sharper than you’d like even when strained cold, the parent yogurt was probably over-fermented to begin with; checking the set with a calibrated meter, the kind I cover in my guide to the best pH meter for fermentation, takes the guesswork out.
How Long to Strain for Which Texture
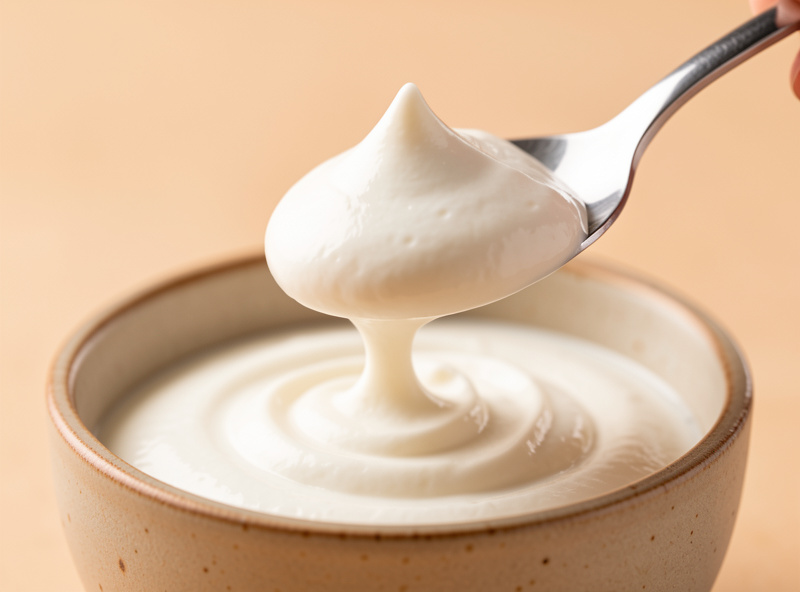
Drain time is the only dial that matters once the yogurt is in the cloth. The exact numbers shift slightly with your yogurt’s starting thickness and your fridge temperature, but on the batches I’ve pulled the pattern is reliable. At about 2 hours you get a lightly thickened yogurt, looser than commercial Greek but with a noticeably richer body — good for drizzling and breakfast bowls. At around 4 hours you land on the classic Greek-yogurt texture: thick, scoopable, holds a soft peak on the spoon. Push to 8 hours and it becomes dense and almost spreadable, edging toward cheese, with the most whey driven off and the most concentrated flavour.
I check by lifting a spoonful rather than by the clock alone. If it slumps flat, give it more time; if it holds a clean ridge, it’s done. Remember the volume rule: by the time you’ve reached a proper Greek texture you’ll have lost roughly half the original volume to whey, so start with more yogurt than you think you need.
What to Do With the Whey
Every litre you strain hands you a generous pour of acidic, slightly cloudy whey, and throwing it down the drain is a waste. It’s mildly sour and full of the same culture activity as the yogurt, which makes it genuinely useful in the kitchen.
I use it three ways. First, as a backslop to kickstart vegetable ferments — a splash of yogurt whey lowers the pH of a brine and gives lacto-fermenting vegetables a faster, more confident start. Second, in baking: swap it in for part of the water or buttermilk in bread, pancakes, or biscuits for a tender crumb and a faint tang. Third, to thin soups, smoothies, or marinades where a little acidity is welcome. Store it in a sealed jar in the fridge and use it within a week or so while it’s fresh.
Troubleshooting Too Thin or Too Thick
Two problems cover almost every failed strain. Too thin usually means one of three things: you didn’t strain long enough, your cloth was too coarse and let solids escape with the whey, or your parent yogurt was thin to start with. Fix it by straining longer, doubling up the cloth, or starting from a firmer set. Too thick is the easier failure — you simply strained past your target. Stir a little of the reserved whey back in to loosen it to the consistency you want; nothing is wasted and the texture comes right back.
One more: if the surface looks fine but the centre is still loose after hours, the rig was probably sitting too close to its own whey, soaking the underside back up. Make sure the sieve clears the collected liquid by a good margin. The same discipline I apply across cultured dairy — cold work, clean gear, patience — is what I lean on in the wider cultured dairy guide as well.
Going Further: Labneh and Skyr
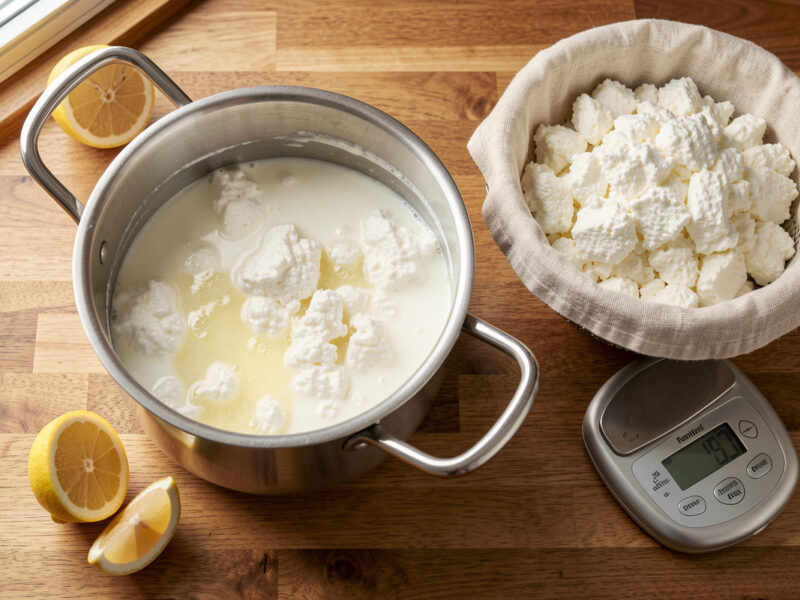
Once straining is muscle memory, two destinations open up. Labneh is just yogurt strained well past the 8-hour mark, salted lightly before or during straining, until it firms into a spreadable yogurt cheese you can roll into balls and store under oil. It’s the most rewarding next step and uses nothing you don’t already have.
Skyr is the Icelandic strained-yogurt cousin, traditionally made with a trace of rennet alongside the culture, which sets it even thicker and milder than ordinary Greek yogurt. It sits a little outside pure straining because of that rennet step, but the finishing principle is the same: a thermophilic set, then drained cold. If you enjoy concentrating dairy this way, the same hands-on logic carries straight over to cultured butter and to sour cream and crème fraîche.
How long should I strain yogurt for Greek yogurt?
Anywhere from 2 to 8 hours in the fridge. About 2 hours gives a lightly thickened yogurt, 4 hours the classic scoopable Greek texture, and 8 hours a dense, nearly spreadable result. Check by lifting a spoonful.
How much Greek yogurt does one litre of plain yogurt make?
Roughly half. One litre of plain yogurt strains down to about 500 ml of Greek yogurt, with the remaining volume pouring off as liquid whey. Start with more yogurt than your target amount.
Can I strain yogurt at room temperature?
No, strain it cold in the fridge. At room temperature the residual Lactobacillus keeps fermenting and over-acidifies the batch, leaving it unpleasantly sour. Cold straining keeps acidity stable while gravity removes the whey.
What can I do with the leftover whey?
Use it as a backslop to kickstart vegetable ferments, swap it in for part of the liquid in baking, or thin soups, smoothies, and marinades. Store it sealed in the fridge and use within about a week.
What is the difference between Greek yogurt, labneh, and skyr?
Greek yogurt is strained plain yogurt. Labneh is yogurt strained longer and salted into a spreadable cheese. Skyr is the Icelandic cousin, often made with a trace of rennet, which sets it even thicker than Greek yogurt.
Related Guides
- The Complete Cultured Dairy Guide
- Homemade Yogurt: A Beginner’s Guide
- How to Make Cultured Butter at Home
- Sour Cream and Crème Fraîche Guide
- The Best pH Meter for Fermentation

About Kenny Nyhus Fadil
A home fermenter documenting brines, bubbles, and the occasional moldy tragedy.
Keep Bubbling

How to Make Homemade Yogurt: A Beginner’s Guide
Home Cheesemaking: A Beginner’s Guide to Fresh Cheese