How to Make Fermented Hot Sauce at Home (Beginner Pepper Mash)

Make fermented hot sauce by fermenting chopped chili peppers with 3.5-5% salt in a jar with airlock for 2-4 weeks, then blending the mash with vinegar. The result is complex tangy hot sauce with depth fresh-blended sauces cannot achieve — total cost $8-15, total time 3-5 weeks.
Beginner pepper mash is the gateway to a longer fermented hot sauce craft; six methods, four years of garden batches, and the aging-bottling system are in my fermented hot sauce guide.
My first pepper mash was a half-pound of Fresnos I chopped bare-handed. I burned my fingers for six hours and ruined a pair of contact lenses the following morning. Despite the amateur start, that five-week ferment produced sauce better than anything I had bought at a grocery store. A single pint jar turned me into a fermentation evangelist.
Fermented hot sauce is the gateway lacto-fermentation project for hobbyists who want to step beyond sauerkraut. Peppers tolerate a wide range of fermentation conditions, the salt math is forgiving, and the finished product has obvious commercial-quality flavor that motivates continued projects. The base recipe scales from 1 pound to 10 pounds of peppers without ratio changes; the same ferment time produces consistent results across batch sizes.
Pepper Selection and Prep
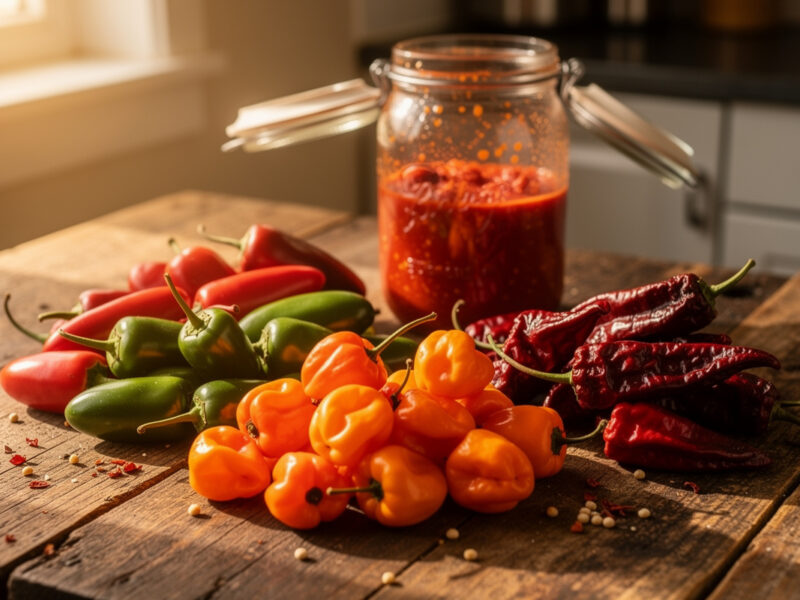
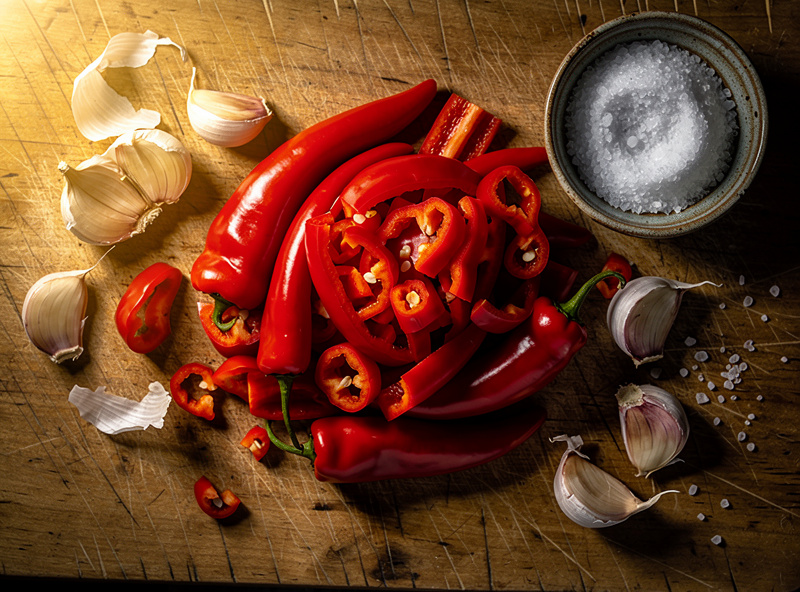
Choose ripe red, orange, or yellow peppers for the brightest fermented flavor — green peppers ferment fine but produce duller-colored sauce. Heat level is your choice: jalapeño (mild), serrano (medium), habanero (hot), Carolina Reaper (extremely hot). Most hobbyist sauces use 50-70% medium-heat peppers plus 20-40% sweet bell peppers for body and 10-20% high-heat peppers for kick.
Pepper selection guide:
- Jalapeño/Serrano (mild-medium): Foundation for most homemade hot sauces. 2,500-25,000 SHU.
- Cayenne/Tabasco (medium): Bright red color and balanced heat. 30,000-50,000 SHU.
- Habanero/Scotch Bonnet (hot): Tropical flavor and significant heat. 100,000-350,000 SHU.
- Carolina Reaper/Ghost (extreme): Use sparingly; gloves required. Above 1,000,000 SHU.
- Bell pepper (no heat): Adds body and color without heat. Useful in 20-40% blends.
- Trinidad Scorpion/7 Pot: Specialty hot peppers; complex flavor under extreme heat.
Wear nitrile gloves when handling hot peppers; capsaicin oil transfers to skin and causes burning sensations for hours. Avoid touching face, eyes, or contact lenses while handling. Read about hot sauce mold issues in our fermented hot sauce mold guide.
The Recipe and Procedure
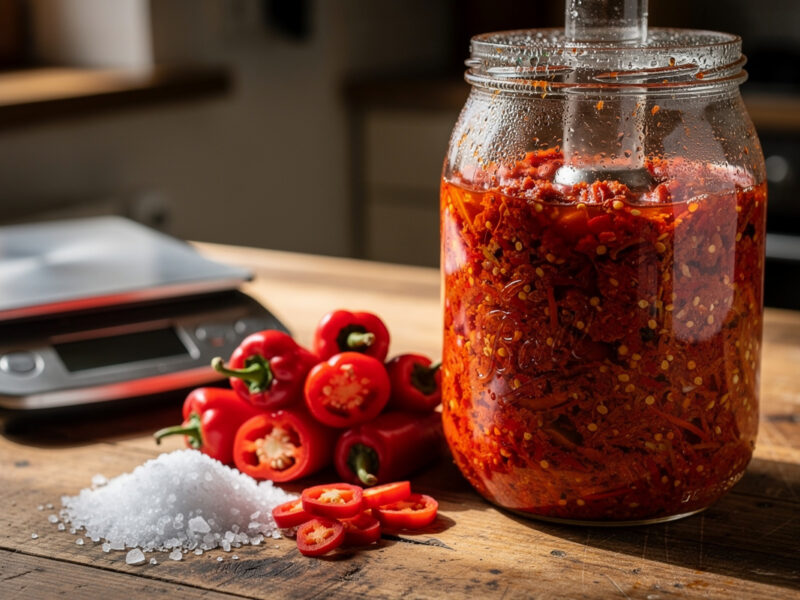
For 1 pound of peppers (yields about 12-16 oz of finished hot sauce): 1 lb mixed chili peppers, 18g salt (4% by total weight including added water — chili mash sits at the higher end of the lacto-fermentation salt range, 3.5-5%, because peppers are more mold-prone than cabbage), optional: 2 cloves garlic, 1 tablespoon brown sugar, 1/4 onion. Add 1/2-1 cup of vinegar after fermentation completes for shelf-stability. Total cost about 8-15 dollars depending on pepper variety prices.
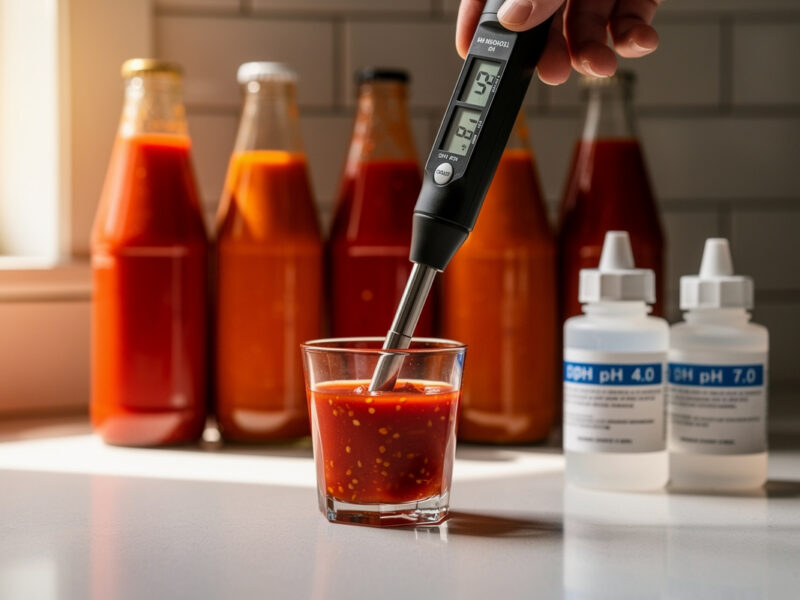
Three essential tools make hot sauce fermentation repeatable: a wide-mouth fermentation jar with airlock lid ($15-25 — Mortier Pilon and Kilner both work well), a kitchen scale accurate to 1g, and a pH tester ($12 digital model) to confirm brine has dropped below 4.0 for safety. These three items cover every batch from pepper prep to blending without specialty equipment.
As an Amazon Associate I earn from qualifying purchases.
Step-by-step procedure:
- Wash and stem the peppers: Remove stems but leave seeds for traditional flavor (or remove seeds for milder sauce).
- Chop coarsely or process briefly: 1/4-inch chunks. Smaller pieces ferment faster.
- Add aromatics: Garlic, onion, or other flavorings.
- Weigh combined ingredients: Total weight including any added water.
- Calculate salt: 4% of total weight (chili-mash target, 3.5-5% range): 1 pound (453g) needs about 18g salt.
- Mix salt with peppers: Stir thoroughly until salt is fully distributed.
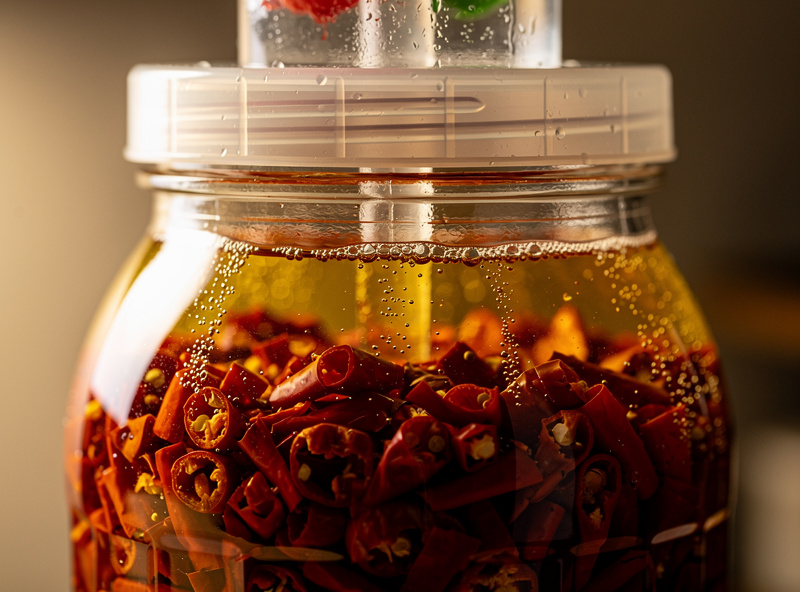
- Pack into a fermentation jar: Press down to compact; release air bubbles.
- Add fermentation weights to keep peppers submerged: Glass weights work; or use a fermentation lid with airlock.
- Fit airlock or fermentation lid: Allows CO2 to escape without letting air in.
- Ferment at 65-72°F for 2-4 weeks: First week shows visible bubbling; flavor mellows by week 2-3.
- Verify fermentation completion: Brine smells tangy and slightly fermented (not just spicy and fresh). pH should be below 4.0.
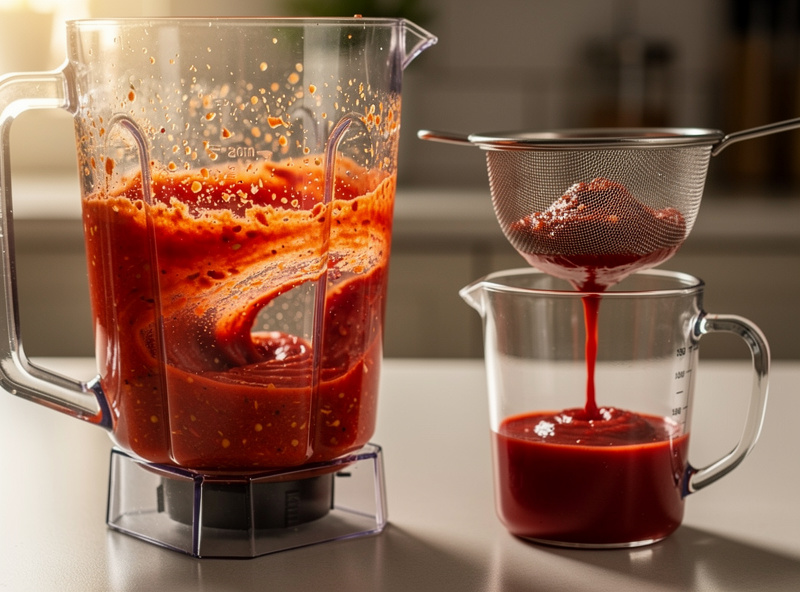
- Blend the mash: Transfer fermented peppers to a blender; puree until smooth.
- Strain (optional): Through fine mesh for smoother sauce, or leave with pulp for thicker style.
- Add vinegar to balance acidity and shelf-stability: 1/4 to 1/2 cup white vinegar per pound of original peppers.
- Bottle and refrigerate: Lasts 6-12 months in refrigerator; can be water-bath canned for shelf storage.
The fermentation period is the variable that produces commercial-style flavor. Shorter ferments (1 week) taste like fresh peppers with mild tanginess; longer ferments (4+ weeks) develop complex umami and depth that mimics aged hot sauces.
Common Mistakes
Five mistakes ruin most first batches: insufficient salt (mold growth), peppers not submerged in brine (surface mold), fermenting too cold (stalled), iodized table salt (prevents fermentation), or skipping the airlock (oxygen access).
Mistakes and corrections:
- Below 3.5% salt: Insufficient to suppress mold on a pepper mash. Always 3.5-5%.
- Exposed peppers above brine: Surface molds. Use weights or wrap brine-soaked cabbage leaves over.
- Iodized table salt: Iodine kills fermentation cultures. Use kosher or sea salt.
- Below 60°F fermentation: Stalls. Move to warmer location.
- Above 80°F fermentation: Off-flavors and excess yeast. Move to cooler location.
- No airlock or vent: CO2 builds up; jar can crack or explode.
- Skipping the post-fermentation vinegar: Sauce safety improves with added acid; shelf-life extends 3-6 months.
The real safety line, confirmed by the FDA’s acidified-foods guidance (curl-200 content-verified, equilibrium pH 4.6 or below prevents Clostridium botulinum growth and toxin formation), is pH 4.6 — fermented hot sauce drops well under that, typically into the 3.4-3.8 range within 10-14 days, which is why it’s one of the safest home ferments. A basic $12 digital pH tester provides reassurance that fermentation is proceeding correctly and comfortably clear of the 4.6 threshold.
Read about hot sauce-specific safety in our fermented hot sauce mold guide.
My own worst mistake was prepping peppers on a cutting board with residual raw chicken juice — the batch developed off-flavors within the first week and I had to dump all three jars. I have also undersalted a batch at 1.5% salt, which grew surface mold within four days. Both failures were preventable with basic sanitation and a kitchen scale accurate to 0.1g.
Flavor Variations and Style Inspirations
The basic 3.5-5% salt pepper-mash ferment scales into dozens of regional and personal styles. Mexican-style hot sauces add tomato, onion, and lime; Caribbean styles add tropical fruit and allspice; Louisiana-style emphasizes the cayenne-and-vinegar profile; Korean-style ferments incorporate gochugaru and garlic. Each style starts from the same base technique — fermented pepper mash — and diverges at the post-fermentation flavoring step.
Style-specific additions to add after fermentation:
- Louisiana style (Tabasco-like): 50% white vinegar to mash; minimal additional flavorings. Pure heat plus tang.
- Mexican-style salsa-rojas: Add charred tomato, roasted garlic, lime juice, cumin to blender. Deep complex sauce.
- Caribbean style: Mango or pineapple chunks, allspice, brown sugar, ginger. Tropical-sweet heat.
- Korean-style gochujang-adjacent: Add gochugaru, miso paste, sesame oil. Umami-forward heat.
- Carolina-style: Mustard, brown sugar, vinegar. BBQ-friendly profile.
- Asian fish-sauce style: Add 1-2 tablespoons fish sauce, lime juice. Deep umami background.
- Smoky chipotle blend: Use chipotle peppers in adobo (already smoked); add 2-3 tablespoons of adobo sauce.
- Garlic-heavy “green” sauces: Use jalapeño + tomatillo + cilantro + lime. Tangy fresh sauce.
The fermentation produces the foundation flavor; the post-ferment additions produce the style. Most home hot-sauce makers eventually settle on 2-3 favorite combinations that they make repeatedly. The base ferment can be split into 3-4 batches for testing different post-ferment profiles from one fermentation run.
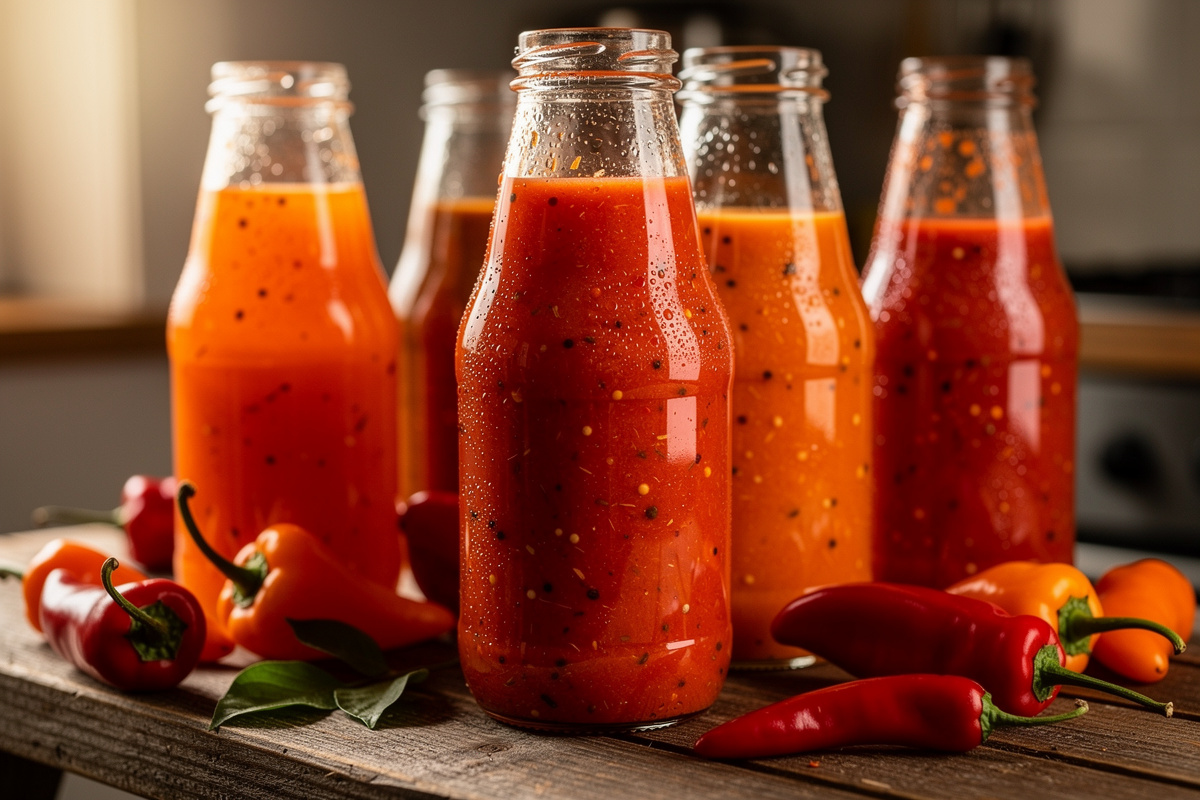
Bottling and Shelf Stability
Bottle finished hot sauce in clean glass bottles with screw caps or swing-tops. The post-fermentation vinegar reduces pH below 4.0, suppressing pathogenic bacteria; refrigerated storage further slows microbial activity. Most home hot sauces last 6-12 months in the refrigerator with no quality changes; longer storage produces gradual color darkening but flavor remains stable.
Storage and bottling notes:
- Use clean glass bottles: Sterilize with boiling water or run through a dishwasher hot cycle.
- Leave 1/4 inch headspace: Allows for thermal expansion in the refrigerator.
- Refrigerate immediately after bottling: Maintains live cultures and slows oxidation.
- Label with date and recipe: Year-old hot sauce vs week-old has notably different intensity.
- Water-bath canning option: Process in boiling water bath for 10-15 minutes if shelf-stable storage needed. This kills live cultures but extends shelf life to 12-18 months.
- Avoid plastic bottles: Some hot sauce flavors leach through plastic over time; glass holds flavor longer.
- Hot sauce gift-giving: Small 4-oz glass bottles with custom labels make popular gifts. Plan for 24+ bottles per pound of finished sauce.
The vinegar addition is the single most important step for shelf stability. Without vinegar, fermented hot sauce remains live-cultured and slowly continues fermenting, eventually producing carbonation that can pop the bottle cap. With vinegar at 25-50% by volume, fermentation slows essentially to a stop and the sauce stays stable.
Conclusion
Start with Fresnos, not habaneros. Mastering fermentation on affordable medium-heat peppers teaches you to read brine activity, recognize off-smells, and build confidence with salt ratios — skills that transfer to every other fermented hot sauce recipe. Once you have completed three successful mild batches, graduate to habaneros, then Trinidad Scorpions, then your own custom pepper blends. Spice level matters second; fermentation mastery matters first.
Frequently Asked Questions
How long does fermented hot sauce take to make?
2-4 weeks of fermentation plus 1 day for blending and bottling. Total project time is 3-5 weeks. Shorter ferments (7-10 days) work but produce less complex flavor; longer ferments (4+ weeks) develop deeper umami at slight texture cost.
What salt percentage for fermented hot sauce?
3.5-5% salt by total weight including any added water, higher than most vegetable ferments because pepper mash is more mold-prone. For 1 pound peppers: about 18g salt at the 4% middle target. Below 3.5% risks mold growth; above 5% slows fermentation excessively.
Do I need to remove pepper seeds before fermenting?
No — seeds ferment fine and add flavor and texture to the final sauce. Some recipes specifically include seeds for the slight bitter complexity. If you prefer smoother sauce, strain after blending instead of seeding before fermenting.
How long does homemade fermented hot sauce last?
6-12 months in the refrigerator with the post-fermentation vinegar added. Without vinegar, 2-4 months. Water-bath canning extends shelf life to 12-18 months but kills the live cultures from fermentation.
Can I use frozen peppers for fermented hot sauce?
Yes — frozen peppers work fine. Some makers prefer frozen because freezing breaks down cell walls and accelerates initial flavor extraction. Thaw before chopping; use the same salt ratio as fresh peppers.
What is the difference between fermented and cooked hot sauce?
Fermented hot sauce develops complex umami and tangy depth from the lacto-fermentation that cooked sauces cannot replicate. Cooked sauces are faster (no 2-4 week wait) but taste one-dimensionally hot. Fermentation produces the flavor depth of high-end commercial sauces like Cholula or Marie Sharp’s.
Related Articles
- Fermented Hot Sauce Mold: Is It Safe?
- Why Did My Sauerkraut Turn Mushy?
- Kahm Yeast Guide
- Lacto-Fermented Pickles That Stay Crunchy
- Easy Napa Cabbage Kimchi Recipe

About Kenny Nyhus Fadil
A home fermenter documenting brines, bubbles, and the occasional moldy tragedy.