Lacto-Fermentation for Vegetables: The Complete Home Guide

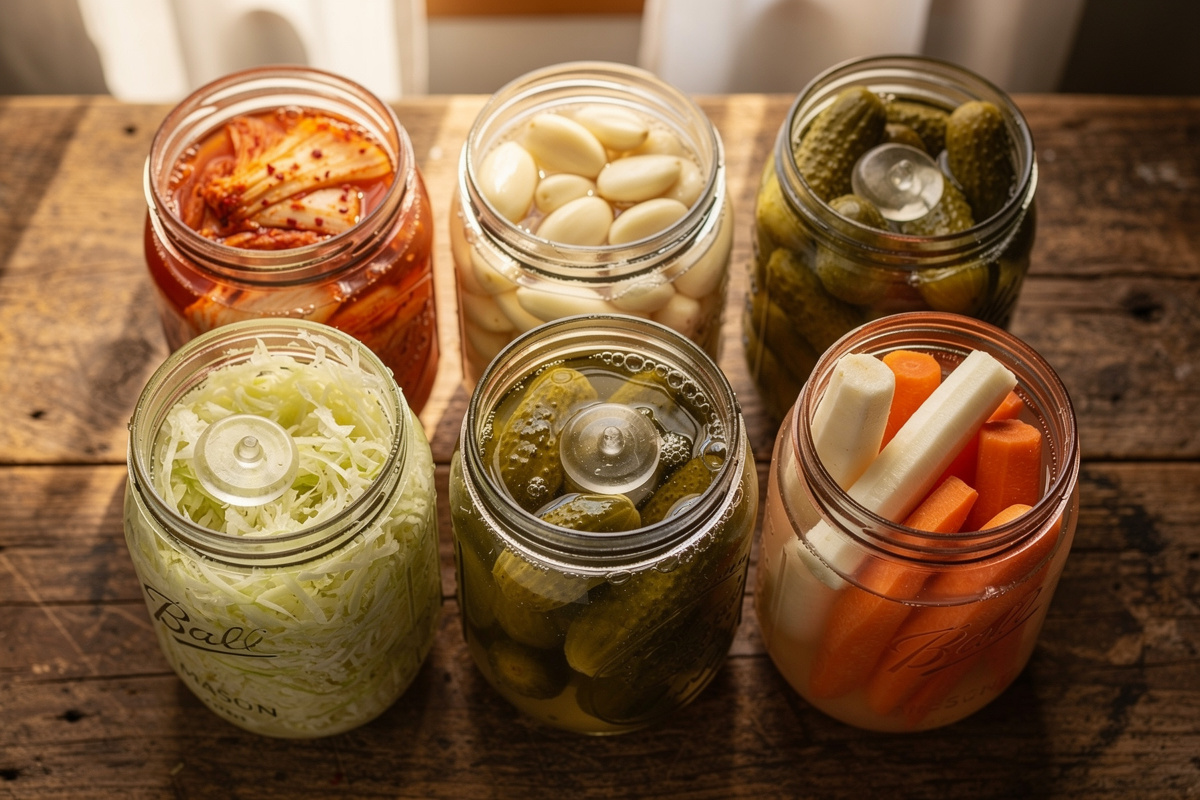
Lacto-fermented vegetables are the cheapest way to turn a garden glut into something that lasts — under 3 dollars per litre of finished pickle, six weeks of fridge life, and a flavour deeper than anything a vinegar pickle can produce. After five years of running concurrent crocks of sauerkraut, kimchi, lacto-pickles, lacto-garlic, kvass, and Korean radish, my kitchen has settled into a six-jar rotation that produces a new ferment every 7-10 days and never goes empty. This guide is the full system, plus the failures that taught me how to get it right.
The science is simple but unforgiving on three variables: salt percentage (decides whether you get lactic-acid bacteria or rot), anaerobic conditions (decides whether you get pickle or mold), and temperature (decides flavour profile and fermentation speed). Miss any of the three and the batch fails. Get all three right and you can ferment almost any vegetable from any garden harvest with a 95 percent success rate. The recipes are forgiving once the variables are set; the variables are not forgiving.
The Science: Salt, Anaerobic, and Lactobacillus
Lacto-fermentation works because lactic-acid bacteria (Lactobacillus, Leuconostoc, and Pediococcus species) tolerate salt and produce lactic acid, while spoilage organisms tolerate neither. A 2 to 3 percent salt brine kills or suppresses most spoilage bacteria while leaving lactobacillus comfortable; the lactobacillus then consumes the vegetable’s natural sugars and excretes lactic acid, dropping the pH below the 4.6 threshold where C. botulinum cannot grow or produce toxin (NCHFP, “Botulism: Think Outside the Jar,” curl-200 content-verified: “C. botulinum bacteria must be kept in a very low-oxygen (anaerobic) environment with a pH above 4.6…and a relatively high moisture content”) — at which point the brine is also shelf-stable for months and unpalatable to anything except more lactobacillus.
Anaerobic conditions matter because surface kahm yeast and various molds need oxygen to grow, while lactobacillus does not. Submerging the vegetable below the brine — with a glass weight, a folded cabbage leaf, or an airlock crock — keeps the surface anoxic and starves the spoilage organisms before lactobacillus has a chance to acidify the brine. The two most common beginner failures are insufficient salt and unsubmerged vegetable; both fail in the same direction (mold or kahm yeast on the surface) but for different mechanical reasons.
Temperature decides flavour and speed. At 18-22 C the ferment runs in 7-14 days with a clean tangy profile. At 14-17 C it runs in 21-28 days with a deeper, more nuanced flavour developed by mesophilic lactobacillus strains. Above 24 C the ferment runs in 3-5 days but tends toward harsh acidity and occasional ropy texture. My kitchen sits at a year-round 19-21 C, which is why my rotation cadence is roughly 10 days per ferment.
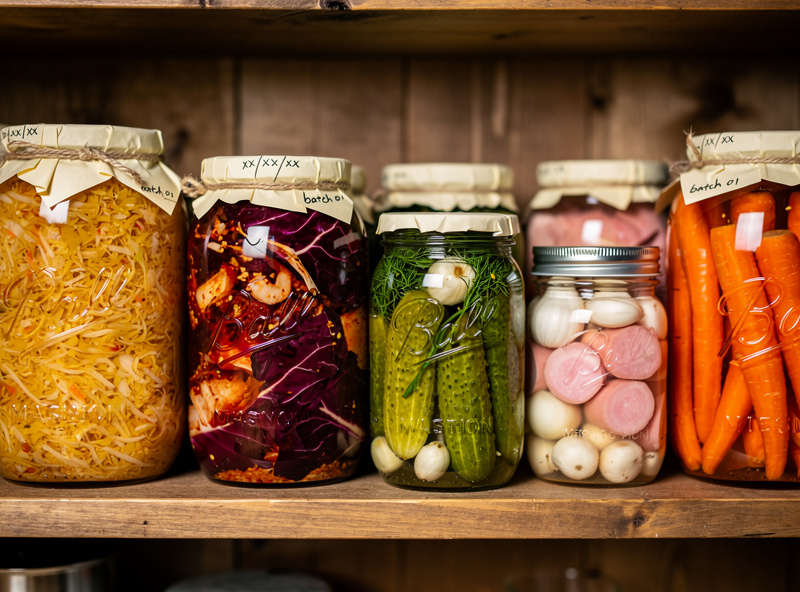
The Six Vegetables I Always Have Fermenting
After five years of experiments, six vegetables earned permanent slots in my rotation. Each one fermets reliably, stores well in the fridge, and gets used in the kitchen weekly. The table below is my actual working calendar — when I start each one, how long it ferments, and how long it lasts refrigerated.
| Vegetable | Salt % | Method | Ferment Time @ 20 C | Fridge Life | Best Use |
|---|---|---|---|---|---|
| Green cabbage (sauerkraut) | 2.0% | Dry-salt, hand-massage | 14-21 days | 6-12 months | Reuben sandwich, charcuterie board |
| Cucumbers (lacto-pickle) | 3.5% brine | Whole or sliced, brined | 7-10 days | 4-6 weeks | Burger topping, gin-and-pickleback |
| Napa cabbage (kimchi) | 2.5% salt rub then paste | Salt-and-rinse then paste | 3-5 days then fridge | 4-6 months | Ramen topping, eggs, jjigae stew |
| Garlic cloves (lacto-garlic) | 3-5% brine | Whole cloves in brine | 3-4 weeks | 12+ months | Pasta finisher, dressings |
| Daikon radish | 2.0% brine | Chunks in brine | 10-14 days | 3-4 months | Banh mi, Korean side dish |
| Carrots, sliced | 2.5% brine | Sticks or coins in brine | 7-10 days | 3-4 months | Snack, salad topping |
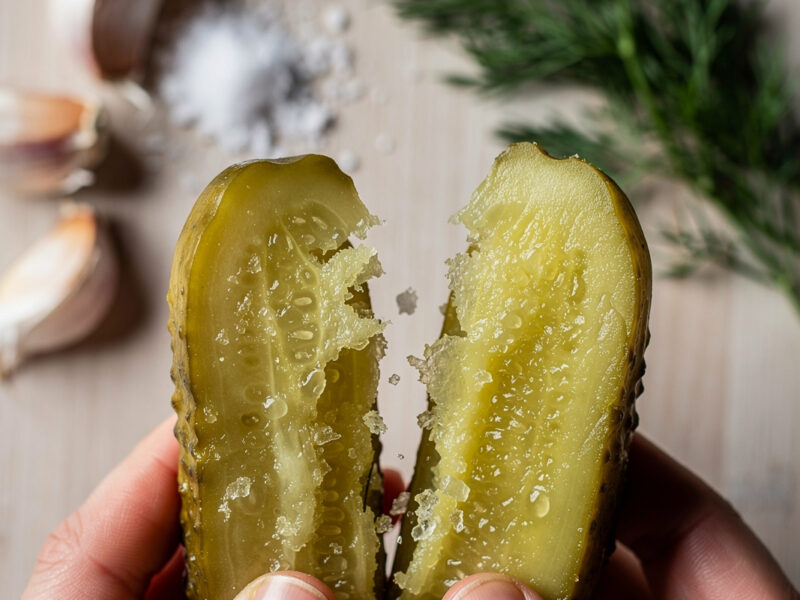
Of the six, cucumbers are the trickiest because they go mushy if you skip the tannin trick (a grape leaf, oak leaf, or black tea bag in the jar adds tannins that keep the cell walls firm). The full crunchy-pickle protocol is in lacto-fermented pickles that stay crunchy, and the broader garden-to-jar workflow for using whatever your garden produces in a given week is in garden to jar fermenting what you grow. For garlic specifically, the honey-vs-brine decision is worth understanding before committing — covered in how to lacto-ferment garlic.
Salt Percentage: The Single Most Important Variable
Salt percentage is the lever that decides whether you have made a pickle or a science experiment. Below 1.5 percent and you risk spoilage bacteria outpacing lactobacillus; above 4 percent and you slow lactobacillus enough that the ferment stalls before pH drops below the safe 4.6 threshold. The reliable working range is 2.0 to 3.5 percent by total weight (vegetable plus water plus salt), and the optimum varies by vegetable density and water content.
The calculation that finally made me consistent: weigh the vegetable plus any added water in grams, multiply by 0.025 for 2.5 percent salt, and that is the grams of salt you need. For a 1-kilogram jar packed with carrot sticks and water filled to the top (about 1.6 kg total), at 2.5 percent salt I use 40 grams. The food scale beats every “tablespoon per cup” recipe — the same recipe with kosher salt vs fine sea salt vs Himalayan pink can vary 30 percent in weight per spoon.
Salt type matters less than the percentage, but only within reason. Use unrefined sea salt, kosher salt, or pure pickling salt. Avoid iodised table salt (the iodine inhibits lactobacillus), avoid salt with anti-caking agents (cloudy brine and off-flavours), and avoid pink Himalayan unless you accept its higher mineral content will tint your brine slightly. My standard is medium-grain unrefined sea salt at 2.5 percent for most vegetables, 2.0 percent for sauerkraut (cabbage is naturally moister), 3.5 percent for lacto-pickles (cucumbers need more to stay firm), and 3 to 5 percent for lacto-garlic (whole cloves need the higher end of the range to stay food-safe and crunchy through a multi-week brine).
Brine Method vs Dry-Salt Method
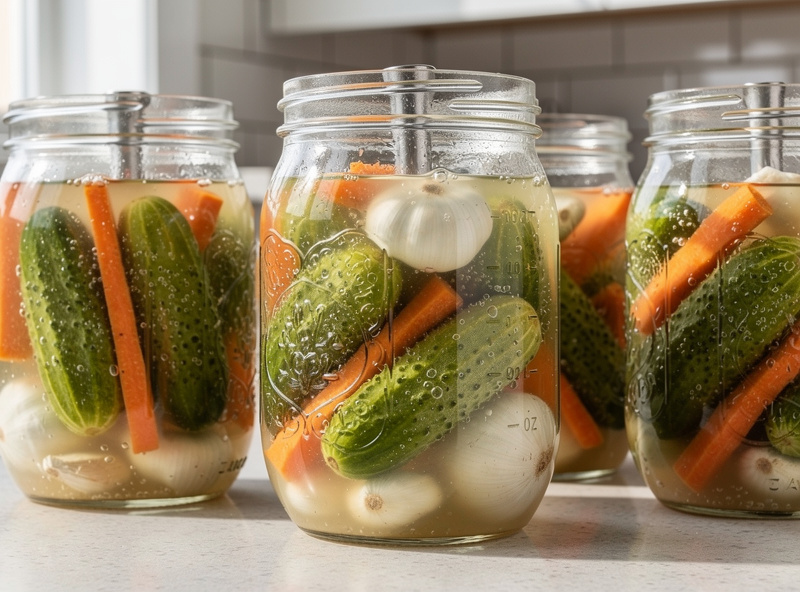
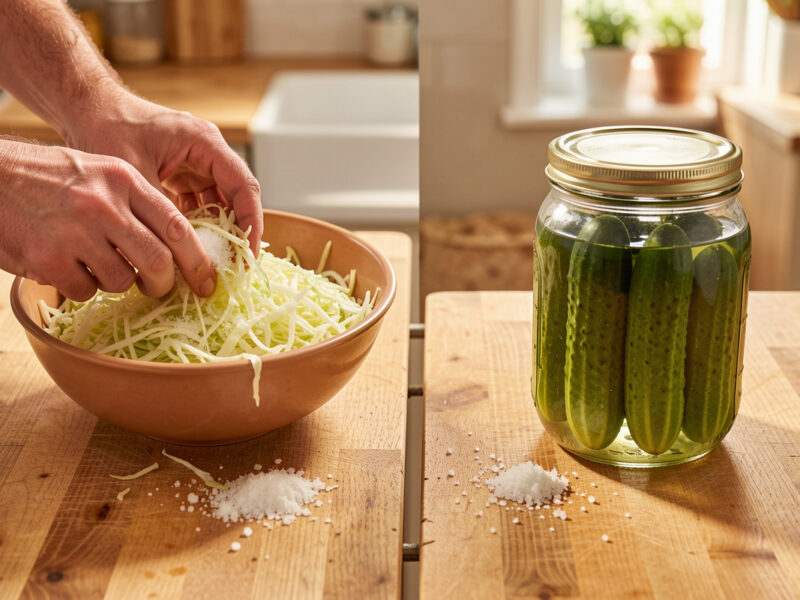
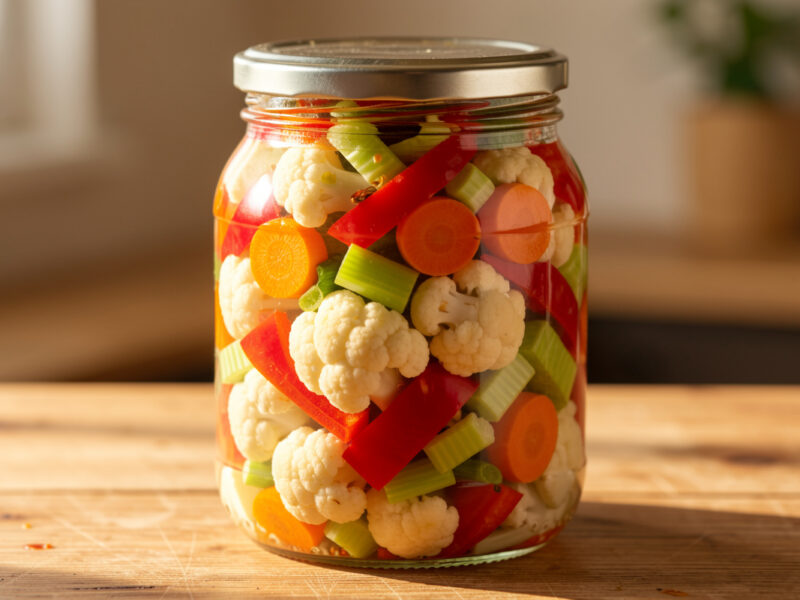
Two methods cover almost every lacto-ferment. Dry-salt is for high-water vegetables that release their own brine when massaged — cabbage, daikon shreds, salted cucumber slices. Brine method is for low-water or whole vegetables that need added liquid — whole cucumbers, garlic cloves, peppers, carrots, beets. The visual outcome is similar (vegetable submerged under cloudy brine that bubbles) but the mechanics differ.
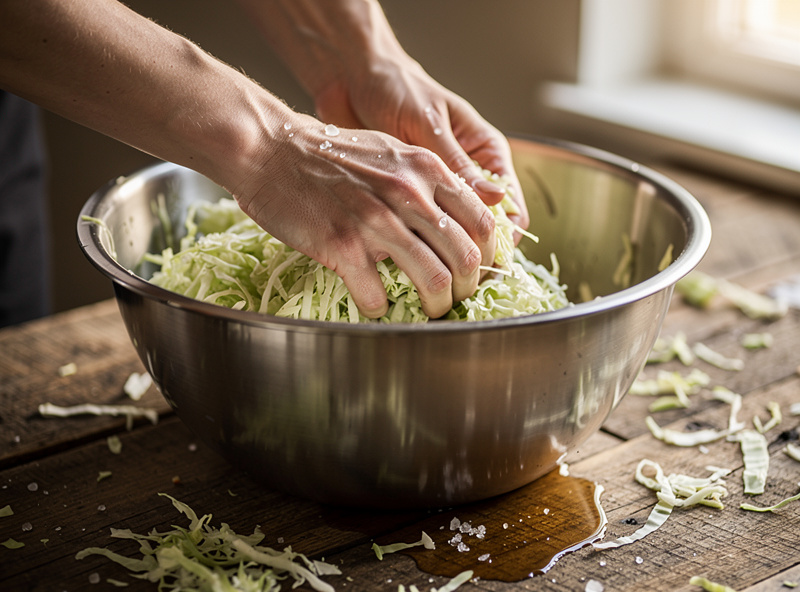
Dry-salt method procedure for sauerkraut: shred 1 kilogram of cabbage to 2-3 mm thickness, weigh in a large bowl, add 2.0 percent by weight unrefined salt (20 grams for 1 kilo), massage vigorously with clean hands for 8-12 minutes. The cabbage releases water as the cell walls break down; after massage you should have a wet, glossy mass with a pool of brine at the bottom. Pack into a crock or jar, pressing down with a fist to submerge the vegetable below its own brine, weight on top, lid down, sit on the counter at 18-22 C.
Brine method procedure for cucumbers: fit whole or halved cucumbers tightly into a jar with garlic, dill, peppercorns, and a tannin source (grape leaf or oak leaf). Dissolve 3.5 percent salt by total weight of jar contents into filtered water — typically 35 grams of salt per litre of water for cucumber-filled jars. Pour brine over cucumbers until fully submerged, weight on top, airlock or loose lid, sit on counter at 18-22 C. The crunch trick (tannins from leaves or black tea) is essential for cucumbers and optional for everything else.
Equipment: Crocks, Jars, Weights, Airlocks
You do not need specialised equipment to lacto-ferment. A 1-litre mason jar with a folded cabbage leaf as a weight and a loose lid produces excellent sauerkraut for about 2 dollars in supplies. Specialised fermentation crocks, glass weights, and airlock lids cost 30-80 dollars and primarily save you the daily skim-and-check work that an open jar requires. After five years I have both, and recommend mason jars for everyone starting out.
My active rotation: one 4-litre Polish-style ceramic crock with water moat (90 dollars, used for large sauerkraut batches), four 1-litre wide-mouth mason jars with glass fermentation weights (18 dollars for jars, 24 dollars for the weight set), and two 500-millilitre jars with silicone airlock lids (16 dollars per lid). The glass weights eliminate roughly 80 percent of the surface-mold and kahm-yeast problems beginners describe; fermentation weights compared walks through glass vs ceramic vs ziplock-bag-of-brine — they all work but the daily-management overhead differs sharply.
Airlocks are worth understanding even if you do not buy them. An airlock lets CO2 escape from the fermenting jar while preventing oxygen from entering, which means you never need to “burp” the jar and you eliminate the daily kahm-yeast skim. The downside is cost (12-16 dollars per lid) and slight overkill for short ferments under 14 days. For sauerkraut, kimchi, and lacto-garlic that run longer, airlocks earn their cost in time saved.
Temperature, Time, and the Daily Check
The daily check during fermentation is non-negotiable for the first week. What you are looking for: active bubbling within 36-48 hours (signs of healthy lactobacillus), cloudy brine starting day 3-4 (also healthy), surface kahm yeast forming a thin white film (cosmetic, skim and continue), and any fuzzy coloured patches on the surface (mold — diagnose carefully). The first 48 hours are when most ferments either start cleanly or signal an underlying problem like insufficient salt.
Temperature control matters more for flavour than for safety. The lactobacillus that lives on cabbage and other vegetables operates across a wide range (10-30 C); the difference is the strain mix and resulting flavour profile. A 20 C ferment produces clean acidic notes; a 16 C ferment produces deeper umami with more complexity; a 25 C ferment produces sharper, harsher flavours and faster timeline. If your kitchen drifts cool in winter, a 30-watt seedling heat mat under the crock at the lowest setting holds 18-20 C reliably for 5 dollars per month of electricity.
Timing rules I follow: taste the ferment at day 7, and again every 2-3 days. Once the flavour reaches what you want, move to the fridge — fridge temperature (3-5 C) slows fermentation roughly 10x but does not stop it, so a properly tangy ferment continues to deepen slightly over the first month in cold storage. Pickles I usually fridge at day 7-10; sauerkraut at day 14-21; kimchi at day 3-5 (kimchi continues developing for weeks in the cold). The age-and-stability principles for longer-storage ferments are documented in fermented pickle brining and curing-chamber aging, which is also where the climate-control crossover with curing chamber climate control becomes useful.
Troubleshooting: Mushy, Cloudy, Mold, Off-Smell
Four common problems cover 90 percent of beginner failures, and three of them are recoverable. Mushy cucumbers: insufficient tannins (no grape leaf), too-warm temperature during fermentation, or cucumbers harvested too long ago. Fix is preventive: tannins in every jar, ferment under 22 C, use cucumbers picked within 24 hours. The detailed mushy-fix decision tree is in sauerkraut mushy fixes, with crossover principles for any high-water vegetable.
Cloudy brine: completely normal from day 3-4 onward. Lactobacillus produces cell debris that clouds the brine; this is a sign of active healthy fermentation, not contamination. If the brine is clear at day 5, you might have an insufficient inoculation — try adding a tablespoon of liquid from a finished ferment to kickstart bacterial activity. Cloudy is good. Clear past day 5 is concerning.
Surface mold versus kahm yeast: both look white at first. Kahm yeast forms a thin papery film, smells slightly yeasty but not bad, and is cosmetic — skim and continue. Mold forms fuzzy raised patches, often coloured (pink, blue, black, green), smells musty or rotten, and means the batch is finished — discard. The single best visual guide is sauerkraut mold vs kahm yeast with photos; once you can tell the two apart, every other surface problem is downstream of that diagnosis. The same visual ID skill transfers to kimchi mold vs white film and to mushroom contamination diagnosis at mycomansion’s contamination guide — fermentation and mycology share the same surface-organism vocabulary.
My Pantry Rotation After Five Years
The system that finally stuck for me runs six concurrent jars on a staggered schedule. Every Sunday I start one new ferment and move one from counter to fridge; the cadence keeps a fresh ferment hitting the table every week without batch-cooking exhaustion. Total active work: about 30 minutes per week, plus weighing.
The rotation by month: January-March (winter crock) — sauerkraut, kimchi, daikon, lacto-garlic; April-June (transition) — radishes, asparagus brine, early cabbage; July-September (peak garden) — cucumbers, peppers, beets, beans, garlic scapes; October-December (autumn put-up) — cabbage, kohlrabi, carrots, more garlic. The garden-to-jar pipeline I follow is documented in garden to jar fermentation; if you also grow vegetables, the seasonal pairing with cityrooted’s composting hub is worth understanding — spent ferment brine is excellent compost activator and pickle scraps go into the worm bin without smell.
One specific note on hydroponic and indoor-grown vegetables: the salt ratio is different. Hydroponically grown lettuce, kale, and cabbage have lower native sodium and higher water content than field-grown — the standard 2.0 percent salt comes out too low and the ferment runs sluggishly. I use 2.3 to 2.5 percent for hydroponic produce. The detailed work-around is in fermenting hydroponic greens, which also covers the cross-domain integration with smarthydrolab’s hydroponic plant guides — if your produce comes off a hydroponic raft, the salt math needs adjustment.
Three Failures That Made the System Work
My first lacto-pickle batch in 2020 used iodised table salt because that was what was in the cupboard. The brine went cloudy on day two — that part was fine — but never developed any meaningful acidity, and by day five the cucumbers were soft and the smell was off. I had inadvertently killed the lactobacillus with iodine. New rule: dedicated unrefined sea salt in a labelled jar near the crock, never grabbed from the table-salt shaker.
Second failure: my first kimchi batch used red pepper flakes from a generic spice rack. The flakes were old and dry, the paste did not bind properly, and the resulting kimchi was bland with a strange dusty mouthfeel. Real Korean gochugaru is finer-grained, fresher, and has a smoky depth that supermarket “red pepper flakes” do not deliver. New rule: gochugaru bought from a Korean grocery, stored in the freezer to preserve volatiles. The kimchi-specific tuning is detailed in napa cabbage kimchi recipe.
Third failure: a 4-kilogram batch of sauerkraut that I started in June during a heatwave. The kitchen hit 28 C for three days; the ferment ran in 4 days flat and turned out harsh, with a slightly metallic taste. New rule: in summer, the crock moves to the basement (16-19 C year-round) and the ferment runs slower with better flavour. The seasonal climate-control intuition transfers directly from the same kind of work covered in curingchamber.com’s write-up on climate control for charcuterie; both disciplines reward boring climate consistency over hero adjustments.
Frequently Asked Questions
What is the safest salt percentage for lacto-fermented vegetables?
Two to three and a half percent salt by total weight (vegetable plus water) is the safe working range for most vegetables; whole-clove lacto-garlic runs 3 to 5 percent. Sauerkraut works at 2.0 percent because cabbage is naturally moist; lacto-pickles need 3.5 percent because cucumbers are denser and need more antimicrobial protection. Below 1.5 percent risks spoilage; above 4 percent slows lactobacillus enough that pH may not drop below the safe 4.6 threshold.
Why is my sauerkraut mushy instead of crunchy?
Three causes: insufficient salt (under 2 percent), too-warm fermentation (over 22 C), or cabbage held too long after harvest before fermenting. Fix by using fresh cabbage within 48 hours of harvest, weighing salt precisely on a food scale, and fermenting at 18-22 C. For cucumbers specifically, add a grape leaf or oak leaf for tannins that keep cell walls firm.
How do I know if my ferment has gone bad?
Three reliable signs of a failed ferment: fuzzy raised mold patches in any colour (white kahm yeast is film-like and harmless; mold is fuzzy and three-dimensional), a rotten or sulphurous smell rather than tangy and yeasty, or a slimy ropy brine instead of cloudy and thin. Cloudy brine and white surface film are both normal and healthy.
Can I reuse the brine from a finished ferment to start a new batch?
Yes. A tablespoon of brine from a successful ferment inoculates a new jar with active lactobacillus and shortens the lag phase by 1-2 days. Particularly useful for fermenting vegetables with low native bacterial loads (hydroponic greens, peeled or cooked vegetables). The brine itself also makes a sharp, salty dressing acid — a good use for what would otherwise go down the drain.
Do I need an airlock to lacto-ferment vegetables?
No, but it eliminates the daily kahm-yeast skim. A mason jar with a folded cabbage leaf weight and a loose lid works for any ferment under 21 days. Airlocks (12-16 dollars per lid) become worth the cost for longer ferments — sauerkraut, kimchi, lacto-garlic — and for low-attention households where the daily check is hard to maintain.
How long do lacto-fermented vegetables last in the fridge?
Sauerkraut and kimchi keep 6-12 months refrigerated; lacto-pickles keep 4-6 weeks (the crunch degrades after 6 weeks even though they remain safe to eat); lacto-garlic and lacto-radish keep 4-12 months. The flavour deepens for the first 4-6 weeks in cold storage, then stabilises. Discard if you ever see mold or smell sulphur — those signal contamination at the cold-storage stage.
Related Guides on FermentFoundry
- Lacto-Fermented Pickles That Stay Crunchy: The Tannin Trick
- Garden to Jar: Fermenting What You Grow
- How to Lacto-Ferment Garlic: Honey vs Brine Methods
- Fermented Pickle Brining and Curing-Chamber Aging
- Sauerkraut Mold vs Kahm Yeast: How to Tell the Difference

About Kenny Nyhus Fadil
A home fermenter documenting brines, bubbles, and the occasional moldy tragedy.
Keep Bubbling
Dry Salting vs Brining Vegetables: When to Use Each Method
Fermented Giardiniera Recipe: Crunchy Italian Mix