Home Sourdough Bread: The Complete Starter-to-Loaf Guide

Sourdough is the ferment with the steepest learning curve and the most rewarding payoff. After five years of weekly loaves — usually two 800-gram boules baked Sunday morning, with a kitchen sourdough starter maintained continuously since 2020 — my house produces roughly 80 loaves per year at a per-loaf cost under 1.20 dollars. The single variable that decides whether a loaf is open-crumb glory or dense brick is starter activity, and beginners almost universally underrate it.
This guide is the full system: how to build a starter from scratch in 7-14 days, why the 70 percent hydration rule exists and when to break it, the bulk-fermentation timing that separates good from great loaves, the cold retard step that builds flavour, and the Dutch oven baking method that produces a competition-grade crust at home. Sourdough rewards patience and repetition; the third loaf is dramatically better than the first, and the tenth is better still.
As an Amazon Associate I earn from qualifying purchases.
The Starter: Wild Yeast and Lactobacillus Living Together
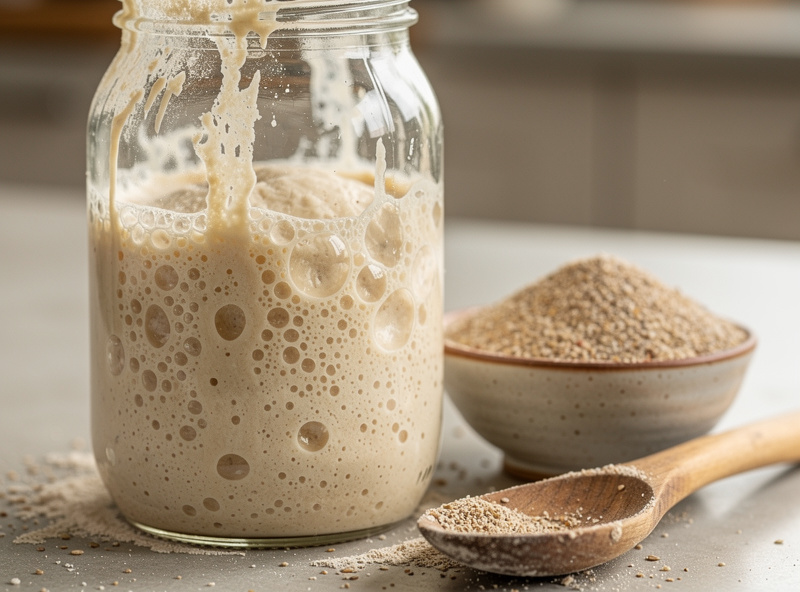
A sourdough starter is a stable colony of wild yeasts (primarily Saccharomyces and Kazachstania species) and lactobacillus bacteria living together in a flour-water medium. The yeasts produce CO2 (which makes bread rise) and ethanol; the bacteria produce lactic and acetic acids (which give sourdough its tang and prevent spoilage). Both must be present and in balance for good bread; starters dominated by either alone produce inferior loaves.
| Starter Stage | Visual Sign | Smell | Action | Typical Day |
|---|---|---|---|---|
| Day 1 — initial mix | Wet flour paste, no activity | Floury, neutral | Cover, wait 24 h | 1 |
| Days 2-4 — false rise | Some bubbles, brief rise | Slightly off, cheesy | Discard half, feed equal parts flour and water | 2-4 |
| Days 4-7 — quiet phase | Little to no activity | Less smelly, neutralising | Continue daily feeds, do not panic | 4-7 |
| Days 7-10 — real activity | Consistent doubling within 8 hours | Tangy, yeasty, pleasant | Two feeds per day | 7-10 |
| Day 10-14 — bake-ready | Reliable doubling in 4-6 hours, predictable | Strong sourdough aroma | Use 30 percent of starter in a levain build | 10-14 |
| Maintenance — established | Doubles in 4-8 hours after feed | Tangy yeasty smell | Daily feed if counter-stored, weekly if fridged | Ongoing |
The false-rise problem on days 2-4 catches almost every beginner. Initial CO2 production is driven by Leuconostoc bacteria, not by the wild yeast you actually want; these bacteria die off by day 4 and the starter goes quiet for several days while wild yeasts establish. New starter-makers often discard the starter at day 5 thinking it has failed, when in fact it is just entering the productive transition. Persist through days 5-7 even if the starter looks dead — true bake-ready activity arrives at day 10-14. Full rescue protocols for stalled starters are in sourdough starter not rising.
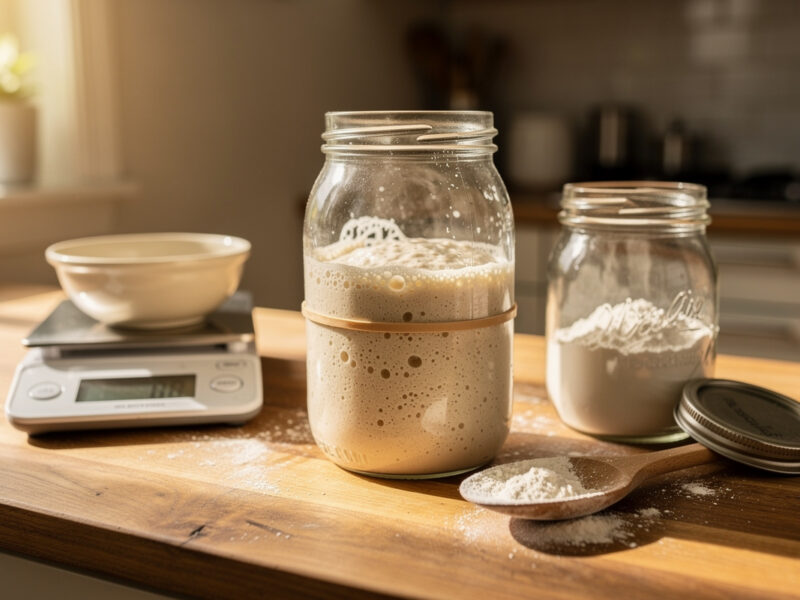
Building a Starter from Scratch: The Day-by-Day Protocol
Day 1: combine 50 grams of whole rye or whole wheat flour with 50 grams of filtered water in a clean glass jar. Stir vigorously until completely mixed and smooth. Cover loosely with cheesecloth or a paper towel held by a rubber band. Leave at 22-26 C for 24 hours. Day 2: discard half the mixture (50 grams), add 25 grams flour and 25 grams water. Stir. Cover. Wait 24 hours. Repeat every 24 hours through day 7. Once your starter is established, the portion you discard at each feed becomes pancakes, waffles, and crackers rather than waste — see my sourdough discard recipes beyond bread.
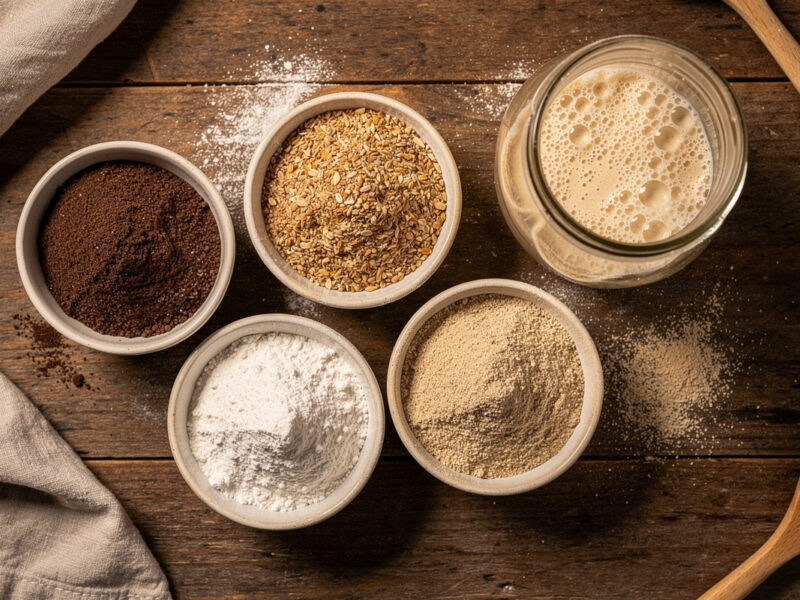
From day 7 onward, move to two feeds per day (every 12 hours) at the same 1:1:1 ratio (old starter to flour to water by weight). The starter should respond to each feed by doubling in volume within 4-8 hours; if it has not by day 10, increase the proportion of whole grain in the flour (whole rye is the most reliable wild-yeast carrier — see best flour for sourdough starter for the full rye-versus-wheat-versus-white breakdown). Filtered water matters more than is commonly admitted — chlorinated tap water can inhibit yeast establishment in sensitive starters; let tap water sit overnight before using, or use bottled spring water.
Temperature is the second underrated variable. Starters at 26-28 C establish in 7-10 days; at 18-22 C they take 14-21 days. If your kitchen is cold, place the jar on top of the fridge (the compressor warms the surface to about 25 C), or use a seedling heat mat. The pattern is identical to the temperature dependence I see in vegetable lacto-fermentation — warmer means faster establishment and slightly different microbial mix; cooler means slower but often more complex flavour development long-term.
Hydration: What 70 Percent Means and Why It Matters
Hydration in sourdough means the weight of water divided by the weight of flour, expressed as a percentage. A 70 percent hydration dough has 700 grams of water per 1000 grams of flour. This number decides everything about how the dough handles, how the crumb opens, and how forgiving the bake is. Beginner sourdough at 65 percent is firm and predictable; intermediate at 70 percent is the standard; advanced at 75-80 percent produces the open-crumb wide-hole loaves that look impressive but are much harder to handle.
My standard recipe at 72 percent hydration: 800 grams bread flour, 200 grams whole wheat flour, 720 grams water, 20 grams salt, 200 grams active sourdough starter (at peak activity, doubled-and-still-rising). The bread flour provides gluten structure; the whole wheat provides flavour and additional wild yeast nutrients; the salt balances and slows fermentation; the starter provides the leavening. Total dough weight: 1940 grams, producing two 800-gram boules plus a small amount of trimmings.
The temptation for beginners is to chase higher hydration immediately — the open crumb in photos is at 80 percent or higher. Resist this — and know that hydration is only one of the four drivers of open crumb, ranked below fermentation, flour strength, and gluten development. 70 percent hydration teaches you to read the dough; 80 percent will batter your confidence with sticky, unmanageable wet messes that produce flat loaves. Once you can reliably hit good crumb at 70 percent, increase by 2-3 percent per batch over multiple weeks until you find the upper limit your flour and technique can handle. The full tier-by-tier breakdown of what 65, 75, and 85 percent feel like is in my sourdough hydration percentage guide.
The Fold-and-Bulk Fermentation Phase
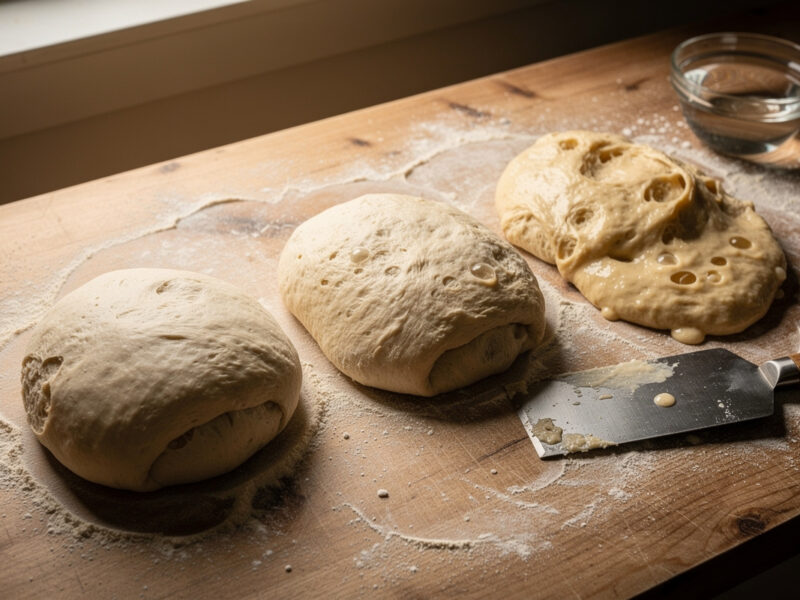
Bulk fermentation is the 3-6 hour window where the mixed dough develops gluten structure and rises to about 50-75 percent volume increase. During this phase you perform 3-4 sets of stretch-and-folds at 30-minute intervals during the first 2 hours, then let the dough rest undisturbed for the remaining time. Each fold builds gluten tension; the rests let the wild yeasts work between folds.
The fold technique: with wet hands, pull up one side of the dough until it just barely tears, fold it back over itself, rotate the bowl 90 degrees, pull and fold again, repeat for all four sides. One round of four folds takes 30 seconds. Cover the dough between folds. After three or four fold rounds, the dough should have noticeably more structure — it pulls back when stretched, holds its shape, and shows visible bubbles starting to form.
Bulk-end timing is the single most important judgement in sourdough. End too early: under-fermented dough, dense gummy bread. End too late: over-fermented dough, flat crumb, sour but structureless bread. The reliable signals: dough has risen 50-75 percent in volume, surface is bubbly and slightly domed, dough pulls away cleanly from the bowl sides when nudged, and a small pinch of dough floats in water (the float test). At 22-24 C with a vigorous starter, bulk fermentation takes 4-5 hours. The over-fermentation pattern is detailed in why is my sourdough bread dense, which is the diagnostic article I send to every friend struggling with their loaves.
Shaping, Cold Retard, and Scoring
After bulk fermentation, divide the dough into the loaf-size pieces you want (my standard: two 970-gram pieces), pre-shape into loose rounds, rest 20 minutes, then final-shape into tight rounds (boule) or oblongs (batard). Tight shaping is what gives the loaf height in the oven; loose shaping spreads sideways. The shaping motion takes practice — watch one video and then do 10 loaves; you will improve faster from doing than from watching.
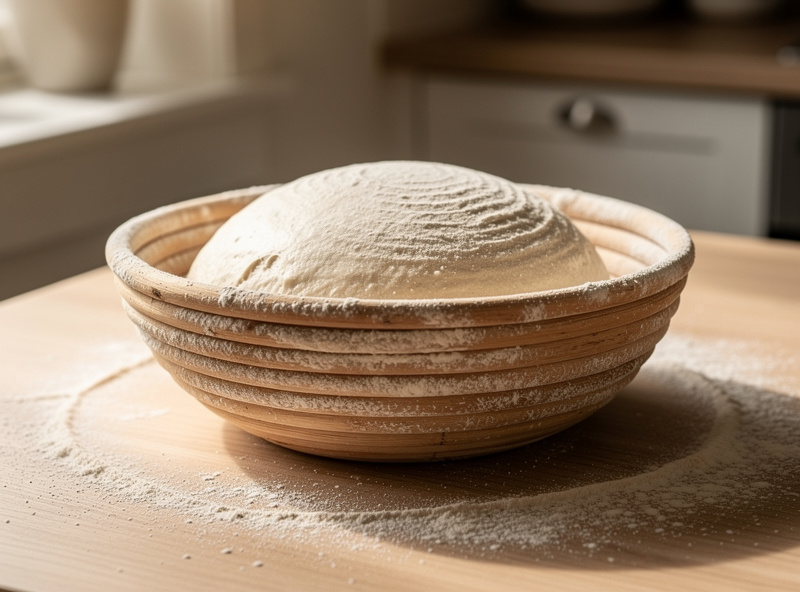
Cold retard (overnight in the fridge at 3-5 C in a flour-dusted banneton basket) is the step that elevates sourdough from good to great. The cold slow ferments develop flavour acids and pre-shape the gluten structure for oven spring. 12-16 hours of cold retard is the standard; shorter is fine but flavour suffers; longer (24-36 hours) is fine if your dough is slightly under-fermented at the bulk end.
Scoring is the final step before bake. A sharp razor blade (proper bread lame or a Gillette double-edge wrapped on a stick) makes a single decisive cut across the top of the loaf, about 0.5-1.5 cm deep. The cut directs where the loaf will expand during oven spring — without a score, the loaf will burst randomly at weak points. Decorative scores are optional but functional ones are not — the full range from a single ear slash to wheat-stalk patterns, plus the angle and depth that make an ear, is in my sourdough scoring patterns guide.
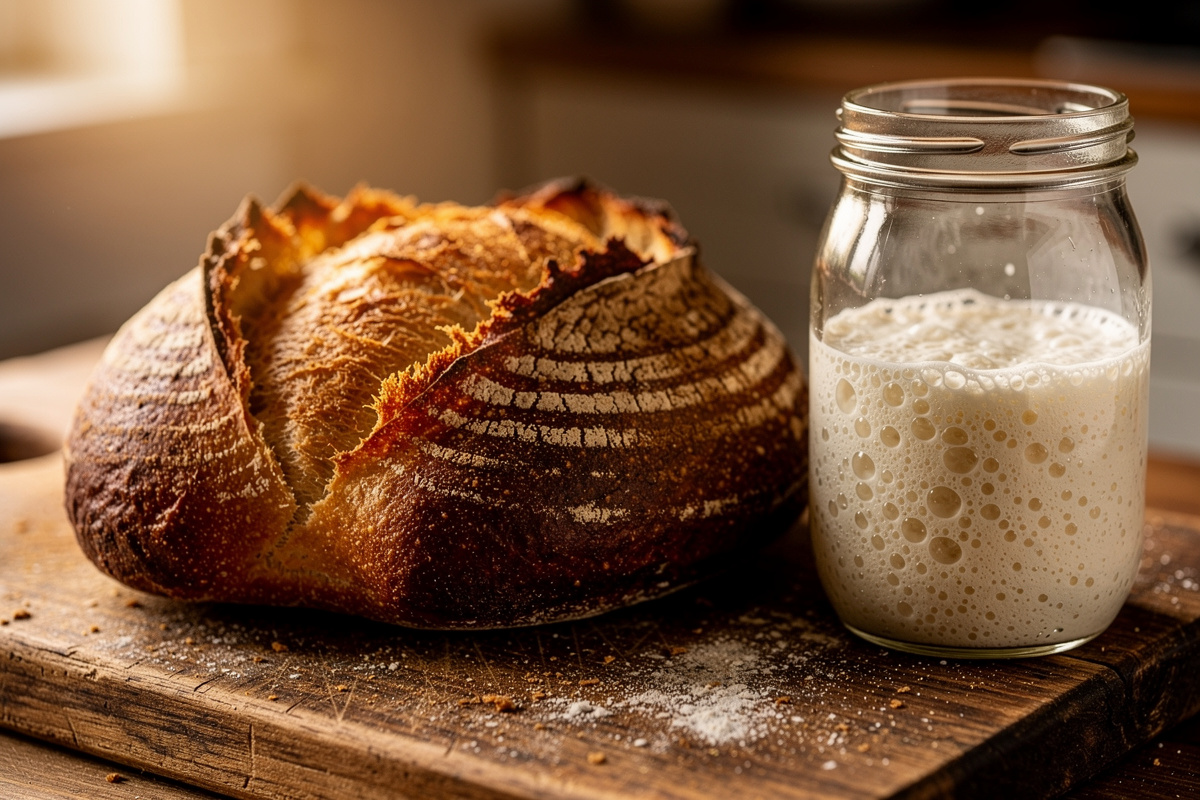
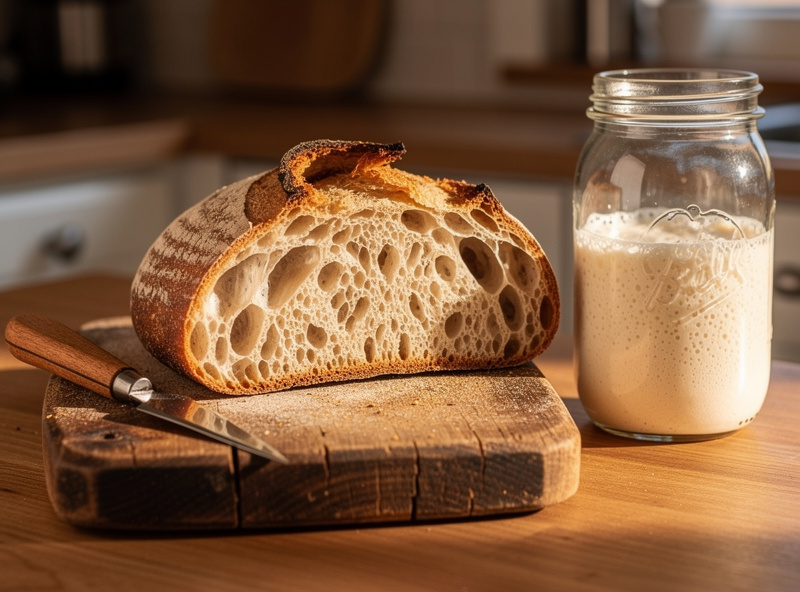
Baking: Dutch Oven, Steam, Crust
Bake in a preheated Dutch oven at 245-260 C for 20 minutes with the lid on (steam phase, oven spring), then remove the lid and bake another 20-25 minutes at 225 C until the crust is deeply browned. The Dutch oven traps moisture from the dough surface, creating the steam environment that produces a glossy crust and full oven spring. For how it compares to a ceramic cloche and to open baking on a stone or steel, see my Dutch oven versus cloche versus open bake guide. Without steam (or without a Dutch oven), the crust sets too early and the loaf cannot expand fully.
Crust colour is your finish indicator. Pale crust means under-baked (continue 5 more minutes); deep mahogany means done; very dark or black spots mean the oven is too hot (drop 10 C next time). Internal temperature should be 96-99 C measured with a probe thermometer — but with sourdough the visual crust check is more reliable because internal temperature is reached before the crust is properly developed.
Cooling on a wire rack for at least 1 hour before slicing is non-negotiable. Hot sourdough has a wet sticky crumb that fixes during cooling; slicing too early gives you gummy-feeling bread that is actually just under-cooled. Three hours of cooling produces the proper crumb texture; overnight cooling produces the chewy-soft crumb sourdough is famous for.
Troubleshooting Dense, Flat, Gummy Loaves
Three common loaf failures cover almost every beginner problem. Dense brick (no rise, tight crumb): starter was not active enough at mix time (do the float test before mixing — starter should float). Flat puddle (spreads sideways instead of up): under-fermented bulk, or shaping too loose. Gummy crumb (sticky interior even after cooling): under-baked, over-hydrated, or cut too early — let it cool fully and try a longer bake next time.
The complete dense-bread diagnostic flow is in 10 causes and fixes for dense sourdough, and the starter-rescue procedures for when your starter goes dormant are in sourdough starter not rising. Together those two articles plus this hub cover the 95 percent of sourdough problems home bakers encounter.
One specific note for beginners: do not adjust multiple variables at once. If your loaf is dense, change one thing on the next bake (more bulk time, or more starter percentage, or higher hydration — pick one) and keep everything else identical. Adjusting three variables simultaneously means you cannot identify which fix helped. The same single-variable discipline that applies to vegetable lacto-ferments (covered in my lacto-fermentation guide) applies to sourdough — every batch is a controlled experiment, not a hero adjustment.
Starter Maintenance Through Years
An established sourdough starter is a living organism that needs feeding for as long as you want to bake with it. Two viable maintenance schedules: counter-stored (daily feed at 1:1:1, ready to use anytime, good for weekly bakers) or fridge-stored (weekly feed at 1:2:2, needs 12-24 hour wake-up before bake, good for occasional bakers). The full counter-versus-fridge feeding rhythm, exact ratios, and travel backups are in my sourdough starter feeding schedule.
My starter has been continuously alive since spring 2020 — fed daily through baking weeks, fridged for travel, dried-and-rehydrated for one extended trip. The starter has its own name (which is silly but useful for tracking — when I dried a backup in 2022 and labelled the jar, knowing the starter was named Inkbird made it easy to find years later). Treat starters as long-lived members of the kitchen; the flavour profile of a 5-year-old starter is genuinely better than a 3-month-old one because the microbial community has had time to specialise.
Backup plans matter for established starters. I keep two backups: a fridged jar of unfed starter in the back of the fridge (revivable within 1-2 feeds even after 2 months of neglect), and a dried-flake batch in a small jar in the freezer (revivable within 4-7 days). Both backups have saved me when I forgot to feed the active starter before a trip. The general principle of perpetual-culture maintenance is shared across the fermentation kitchen — see my home vinegar making guide for the same pattern applied to vinegar mothers, and the kombucha brewing guide for SCOBYs. All three are perpetual cultures with similar care requirements.
My Five-Year Sourdough System
One starter named Inkbird, continuously alive since 2020, fed daily during baking weeks and fridged for travel. Standard weekly bake of two 800-gram boules every Saturday or Sunday morning. Variations through the year: 100 percent bread flour summer loaves (faster bulk in warm kitchens), 30 percent whole grain autumn loaves (deeper flavour, longer bulk), seeded multigrain winter loaves with 8 percent flax and sesame folded in. Total weekly bake work: roughly 4 hours spread across Saturday afternoon and Sunday morning.
The equipment that earned its place: a heavy enamelled cast-iron Dutch oven (70-95 dollars, indispensable), a banneton proofing basket (12-18 dollars), a bench scraper (4 dollars), a digital food scale accurate to 1 gram, a bread lame for scoring (8 dollars). Total starting cost: under 130 dollars. The full equipment context across all my ferments is in my fermentation equipment guide, and the cumulative system across sourdough plus sauerkraut plus kimchi shares enough equipment that adding a second ferment to your kitchen typically costs under 25 dollars in new tools — see my homemade sauerkraut guide for the closely-related dry-salt fermentation that uses much of the same kit.
For a beginner’s first sourdough loaf, my recommendation is patience: spend 14 days building a starter before attempting your first loaf, then bake the same simple 70 percent hydration recipe weekly for 4 consecutive Sundays — using identical flour, identical water, identical timing — to build the muscle memory and the dough-reading skill. By loaf 4 you will be making bread better than most artisan bakeries, and by loaf 10 you will be confident enough to experiment with hydration, flour blends, and folded inclusions. Sourdough rewards consistency more than any other ferment in my kitchen.
Frequently Asked Questions
How long does it take to build a sourdough starter from scratch?
Seven to fourteen days at 22-26 C. The starter goes through three phases: false rise on days 2-4 driven by Leuconostoc bacteria that die off, a quiet phase on days 4-7 while wild yeasts establish, and consistent rising activity from day 7-14 onward. Persist through the quiet phase — most beginners discard prematurely. Cool kitchens (18-22 C) extend the timeline to 14-21 days.
What is sourdough hydration and why does 70 percent matter?
Hydration is the weight of water divided by the weight of flour, expressed as a percentage. 70 percent means 700 grams of water per 1000 grams of flour. Beginner-friendly sourdough sits at 65-70 percent; the iconic open-crumb loaves are at 75-80 percent but much harder to handle. Start at 70 percent until you can reliably read the dough, then increase by 2-3 percent per batch.
How do I know when bulk fermentation is done?
Four reliable signals: dough has risen 50-75 percent in volume, surface is bubbly and slightly domed, dough pulls away cleanly from the bowl when nudged, and a small pinch of dough floats in water (the float test). At 22-24 C with vigorous starter, bulk takes 4-5 hours. Stopping bulk too early gives dense bread; stopping too late gives flat over-fermented loaves.
Why is my sourdough bread dense even though my starter rises?
Three common causes: starter was not at peak activity at mix time (use it within 1-2 hours of doubling, not after collapse), bulk fermentation ended too early (extend by 30-60 minutes next bake), or hydration was too high for your shaping skill (drop from 75 percent back to 70 percent and re-master the basic loaf first). The full ten-cause decision tree is in my dense sourdough bread guide.
Do I need a Dutch oven for sourdough?
Strongly recommended for home sourdough. The Dutch oven traps moisture from the dough surface, creating the steam environment essential for full oven spring and a glossy crust. Without steam (or without a Dutch oven), the crust sets too early and the loaf cannot expand. Alternatives: a covered roasting pan, or steam-injection with an ice cube tray in the bottom of the oven plus a pizza stone.
How do I store and maintain an established sourdough starter?
Two viable schedules. Counter storage at 1:1:1 daily feed for weekly bakers who want the starter always ready. Fridge storage at 1:2:2 weekly feed for occasional bakers, with a 12-24 hour counter wake-up before any bake. Both work indefinitely; my own starter has been continuously alive for five years on alternating schedules depending on travel and baking frequency.
Related Guides on FermentFoundry
- Sourdough Starter Not Rising? Rescue a Dead or Weak Starter
- Why Is My Sourdough Bread Dense? 10 Causes and Fixes
- Lacto-Fermentation for Vegetables: The Complete Home Guide
- Kombucha Brewing: The Complete SCOBY-to-Bottle Guide
- Fermentation Equipment: The Complete Home Brewer Toolkit

About Kenny Nyhus Fadil
A home fermenter documenting brines, bubbles, and the occasional moldy tragedy.